Last updated on 19th Mar 2025| 5507
- Introduction to Azure CLI
- Installing and Setting Up Azure CLI
- Basic Commands in Azure CLI
- Managing Azure Resources with CLI
- Authentication and Security in Azure CLI
- Working with Virtual Machines Using Azure CLI
- Storage and Database Management via Azure CLI
- Networking and Load Balancing with CLI
- Automating Tasks with Azure CLI Scripts
- Debugging and Troubleshooting Azure CLI Commands
- Best Practices for Using Azure CLI Efficiently
- Conclusion
Introduction to Azure CLI
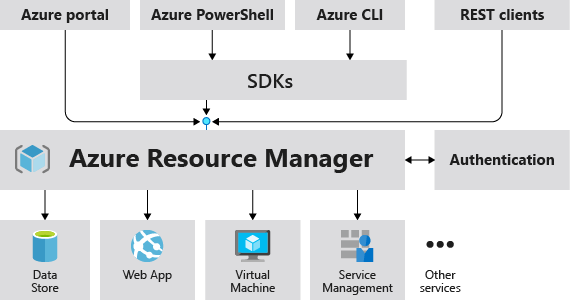
Azure Command-Line Interface (Azure CLI) is a cross-platform tool that enables users to manage and automate tasks on Microsoft Azure. It provides an easy way to interact with Azure services directly from the command line or terminal, allowing for the management of resources, deployment of applications, and monitoring of services. Azure CLI benefits developers, IT administrators, and DevOps teams who prefer working in a text-based environment over a graphical user interface (GUI). As part of Microsoft Azure Training, you’ll learn that the Azure CLI is built on Python and supports multiple platforms, including Windows, macOS, and Linux. This tool is highly effective for managing complex Azure environments, automating workflows, and executing batch operations. Its ease of use and flexibility make it a critical component for any cloud practitioner working with Microsoft Azure.
Installing and Setting Up Azure CLI
Before using Azure CLI, it must be installed on your local machine or server. Azure CLI can be installed on various operating systems, such as Windows, macOS, and Linux. Here are the steps for installing and setting up Azure CLI:
Windows
- Download: Visit the official Azure CLI download page to download the installer.
- Install: Once the installer is downloaded, run it and follow the on-screen instructions.
- Verify Installation: After installation is complete, open Command Prompt or PowerShell and type:
- az –version
- Install via Homebrew: If you have Homebrew installed on your macOS, you can use the following command to install Azure CLI:
- brew update && brew install azure-cli
- Verify Installation: Check the installation with the command:
- az –version
- Ubuntu/Debian-based distributions: To install Azure CLI on Ubuntu, use the following commands:
- curl -sL https://aka.ms/InstallAzureCLIDeb | sudo bash
- Use the following command to install:
- sudo rpm –import https://packages.microsoft.com/keys/microsoft.asc
- sudo curl https://packages.microsoft.com/config/rhel/7/prod.repo >
- /etc/yum.repos.d/Microsoft.repo
- sudo yum install azure-cli
- Verify Installation: Check the installed version by running:
- az –version
- To log in to Azure from the command line, use the following command:
- az login
- Creating a Virtual Machine: az vm create –resource-group MyResourceGroup –name MyVM –image UbuntuLTS –size Standard_DS1_v2 –admin-username azureuser –generate-ssh-keys
- Scaling Virtual Machines: You can scale up or down the resources of a virtual machine. For example, to change the VM size: az vm resize –resource-group MyResourceGroup –name MyVM –size Standard_DS2_v2
- Create Storage Account: az storage account create –name my storage account –resource-group MyResourceGroup –location eastus –sku Standard_LRS
- Create a Storage Blob: az storage blob upload –account-name my storage account –container-name my container –name myblob.txt –file /path/to/local/file.txt
- Create a Database: az sql db create –resource-group MyResourceGroup –server MyServer –name MyDatabase –service-objective S1
- Create a Virtual Machine: az vm create –resource-group MyResourceGroup –name MyVM –image UbuntuLTS –admin-username azureuser –generate-ssh-keys
- Start a Virtual Machine: az vm start –resource-group MyResourceGroup –name MyVM
- Stop a Virtual Machine: az vm stop –resource-group MyResourceGroup –name MyVM
- List Virtual Machines: az vm list –resource-group MyResourceGroup –output table
- Delete a Virtual Machine: az vm delete –resource-group MyResourceGroup –name MyVM –yes
- Create a Virtual Network: az network v net create –name MyVNet –resource-group MyResourceGroup –location east us –subnet-name MySubnet
- Create a Load Balancer: az network lb create –resource-group MyResourceGroup –name MyLoadBalancer –sku Basic –frontend-ip-name MyFrontend –backend-pool-name MyBackend
- List Load Balancers: az network lb list –resource-group MyResourceGroup –output table
- az group create –name MyResourceGroup –location vastus
- az vm create –resource-group MyResourceGroup –name MyVM –image
- UbuntuLTS –admin-username azure user –generate-ssh-keys
- az storage account create –name my storage account –resource-group
- MyResourceGroup –location east –SKU Standard_LRS
- Use –debug Flag: Adds detailed logging for debugging:
- az
–debug - Check Command Syntax: The syntax is correct based on the official Azure CLI documentation.
- Examine Error Messages: Read error messages carefully, as they often contain helpful hints for resolving issues.
macOS
Linux
CentOS/RHEL
Sign In
Eager to Acquire Your Microsoft Azure Certification? View The Microsoft Azure Training Offered By ACTE Right Now!
Basic Commands in Azure CLI
Azure CLI is highly versatile and includes a variety of commands that can help you manage and interact with Azure resources. For example, to check your login status, you can use the az account show command, which shows the details of the current account you’re logged into. To list all available subscriptions within your Azure account, you can run az account list –output table. Creating a resource group is simple with the az group create –name MyResourceGroup –location vastus command, which sets up a new resource group in a specified location. To view all resource groups, you can use the az group list –output table command. If you want to create a virtual machine, as explained in the Complete Microsoft Azure Course, you can use az vm create –resource-group MyResourceGroup –name MyVM –image UbuntuLTS –admin-username azureuser –generate-ssh-keys, which provisions a new Ubuntu-based virtual machine. If needed, you can stop the virtual machine with az vm stop –resource-group MyResourceGroup –name MyVM, and to delete a resource group, use az group delete –name MyResourceGroup –yes –no-wait to remove the resource group and all its resources. Additionally, Azure CLI allows you to scale resources, configure networking, and manage security settings, providing a comprehensive toolset for working with Azure resources. For more advanced management, you can also automate tasks and create scripts to manage resources across multiple environments.
Ready to Earn Your Microsoft Azure Certificate? View The Microsoft Azure Course Offered By ACTE Right Now!
Managing Azure Resources with CLI
Azure CLI allows users to manage various Azure resources, including virtual machines, storage accounts, databases, etc. You can create, modify, and delete resources and configure multiple services directly from the command line. Here are a few examples:
Authentication and Security in Azure CLI
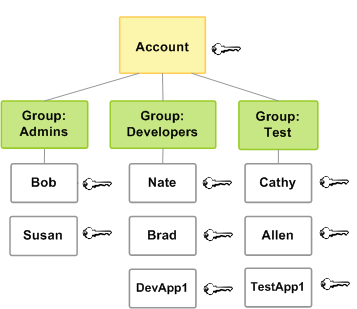
Azure CLI supports various authentication mechanisms to ensure secure and authorized resource access. By default, it uses Azure Active Directory (Azure AD) authentication for secure login, allowing users to authenticate with their Azure AD credentials using the az login command. For automated tasks and CI/CD pipelines, service principals can be used, which provide a non-interactive way to log in by using the command az login –service-principal –username

Working with Virtual Machines Using Azure CLI
Azure CLI provides a set of commands to manage Virtual Machines (VMs) on Azure. Some key operations you can perform include creating, starting, stopping, and resizing VMs.
Cloud Computing Master’s Degree in Cloud Computing? Enroll For Cloud Computing Master Certification Today!
Storage and Database Management via Azure CLI
Azure CLI can also be used to manage Azure storage accounts and databases. To create a storage account, you can use the az storage account create –name myStorageAccount –resource-group MyResourceGroup –location eastus –sku Standard_LRS command, which provisions a new storage account in the specified region with the Standard_LRS redundancy option. For uploading data to Blob Storage, the az storage blob upload –account-name myStorageAccount –container-name myContainer –name myBlob.txt –file /path/to/local/file.txt command allows you to upload local files to a specified container. Similarly, to create a SQL database, the az sql db create –resource-group MyResourceGroup –server MyServer –name MyDatabase –service-objective S1 command can be used to provision a new database on an Azure SQL server. As part of your Microsoft Azure Training , you can list all databases on a specific server using az sql db list –resource-group MyResourceGroup –server MyServer –output table to view details in a tabular format. Azure CLI also provides the ability to scale storage and database resources, manage performance tiers, and automate database backups, making it a comprehensive tool for managing your cloud infrastructure. Furthermore, with commands for setting up access policies and configuring firewall rules, Azure CLI simplifies the management of security settings for both storage and database services.
Networking and Load Balancing with CLI
Azure CLI enables you to manage networking resources like virtual networks, subnets, and load balancers.
Automating Tasks with Azure CLI Scripts
Azure CLI supports scripting for automating tasks. You can write Bash or PowerShell scripts to automate repetitive tasks such as resource deployment, configuration, and management. For example:
#!/bin/bash
# Create a resource group, virtual machine, and storage account
Getting Ready for a Microsoft Azure Job Interview? Check Out Our Blog on Microsoft Azure Interview Questions & Answer
Debugging and Troubleshooting Azure CLI Commands
If a command fails or returns unexpected results, you can use several debugging options:
Best Practices for Using Azure CLI Efficiently
You can use Azure CLI effectively by automating tasks through shell scripts that group common commands for easier execution, streamlining repetitive processes. Leveraging resource groups is also a smart practice, as they allow you to organize resources logically, making it easier to manage and monitor your infrastructure. Additionally, the –output flag in Azure CLI is valuable for improving readability, as it enables you to display data in different formats such as table, JSON, or YAML. Another best practice is to incorporate Azure CLI commands into your continuous integration and deployment (CI/CD) pipelines, automating resource management, ensuring consistent deployments, and helping Improve Code quality with CI/CD Automation. Azure CLI’s flexibility also allows you to integrate with other tools, offering seamless workflows across development, staging, and production environments. You can manage user permissions and configure network settings using the CLI, making it an essential tool for DevOps teams. Furthermore, Azure CLI’s script ability allows you to customize automation to fit specific use cases, providing significant time savings and efficiency.
Conclusion
Azure CLI is a powerful and flexible tool for managing Azure resources and automating tasks. It supports a wide range of services and allows users to quickly create, manage, and monitor resources. By using Azure CLI efficiently, you can significantly streamline your cloud operations, whether you’re deploying virtual machines, managing storage, or automating complex workflows. The ability to script and automate tasks further increases productivity, ensuring consistency and reliability across environments. Additionally, Azure CLI integrates well with other Azure services, enabling seamless workflows across your cloud infrastructure—an advantage often emphasized in Microsoft Azure Training . With its ability to manage security settings, access control, and networking, Azure CLI is an essential tool for DevOps teams and IT professionals. Moreover, its extensive documentation and community support make it easier for users to learn and implement best practices effectively.