- Introduction to Docker Port Mapping
- Understanding Ports in Containers
- Mapping Container Ports to Host Ports (-p flag)
- Why Use Port Mapping?
- Exposing Multiple Ports and Using Different Protocols
- Best Practices and Security Considerations
- Conclusion
“Docker Port Mapping: A Comprehensive Guide to Exposing” explains the process of connecting a containerized application’s internal network to the host machine’s network by mapping ports. This guide covers essential concepts and practical steps for configuring Docker containers to make their services accessible externally. It details how to use the -p or –publish flag to map container ports to host ports, ensuring that applications running inside containers can be accessed by users or other services in Cloud Computing Courses. The guide also addresses best practices for managing port conflicts, securing exposed ports, and troubleshooting common issues, making it an essential resource for developers and system administrators working with Docker.
Interested in Obtaining Your Cloud Computing Certificate? View The Cloud Computing Online Course Offered By ACTE Right Now!
Introduction to Docker Port Mapping
Docker port mapping is a crucial feature in Docker containerization that allows containers to communicate with external systems by exposing specific ports to the host machine. Containers by default are isolated environments, and applications running inside containers are typically not accessible from outside the container unless specific ports are mapped to the host system. Port mapping enables the container to “talk” to the outside world by making certain internal ports of the container accessible to the host or even other containers in Docker Swarm. In Docker, port mapping allows services running inside containers to be reachable via the host machine’s network interfaces, which is essential for creating web applications, databases, or any service that needs external access. When deploying applications in production, you’ll often need to map the container ports to specific ports on the host to ensure seamless communication between users, APIs, and other services.
Understanding Ports in Containers
Before diving into Docker port mapping, it’s essential to understand the concept of ports in containers:
- Internal Ports: Every containerized application runs on specific internal ports that are only accessible within the container. For example, a web server inside a container might run on port 80 or 8080, while a database might use ports like 5432 or 3306. These ports exist within the container’s network namespace and are isolated from the host system. Without explicit port mapping, only other containers within the same Docker network can communicate with them.
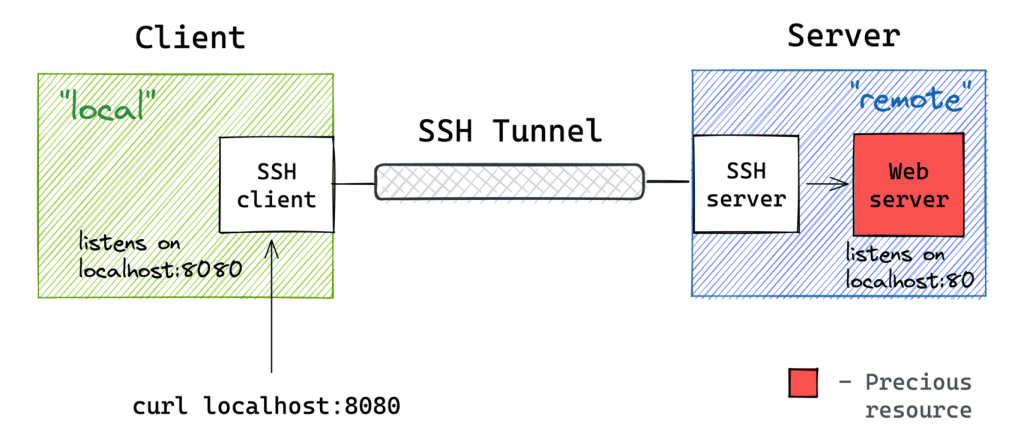
- Host Ports: The host system (where Docker is running) has its own set of ports that are accessible to external services, which can be vulnerable to Cyber Extortion. To make a containerized application reachable from outside, Docker maps internal container ports to host ports. For instance, running -p 8080:80 maps the container’s port 80 to the host’s port 8080, making the application accessible via localhost:8080. Proper configuration of host ports is crucial to ensure security and avoid conflicts with other services.
- Container IPs: Each Docker container is assigned an IP address within its own network, but this IP is only accessible within Docker’s internal network. External systems cannot directly communicate with the container using its internal IP address. To allow external access, port mapping is required to route traffic from the host system to the container. Proper network configurations, such as bridge or overlay networks, help manage how containers communicate with each other and external services.
- Binding to Specific Interfaces: When mapping ports, you can bind them to specific network interfaces using an IP address. This allows you to restrict access to certain networks, enhancing security. For example, binding 127.0.0.1:8080:80 ensures that only local applications can access the container’s service, blocking external requests. This is useful for internal applications that don’t need public exposure.
- Multiple Port Mapping: Docker allows multiple ports to be mapped at the same time, which is beneficial for multi-service applications. For example, an application with a web front-end and an API backend may require mapping -p 8080:80 -p 9090:443. This ensures that all required services are accessible from the host system. Properly managing multiple port mappings helps optimize performance and network security.
- Dynamic Port Allocation: Docker can automatically assign available ports on the host machine using -P (uppercase). This prevents conflicts when running multiple containers that use the same internal ports. Instead of manually specifying ports, Docker finds an open port and maps it dynamically. This feature is useful in environments where many containers run simultaneously, simplifying deployment and reducing manual configuration efforts.
- docker run -p [HOST_PORT]:[CONTAINER_PORT] [IMAGE]
- HOST_PORT: The port on the host machine that you want to bind the container’s port to.
- CONTAINER_PORT: The port inside the container where the service is running.
- [IMAGE]: The Docker image used to create the container.
- #docker run -p 8080:80 my_web_app
- The container exposes port 80 (internal port for a web server).
- The host machine’s port 8080 is mapped to container’s port 80.
- The web application can be accessed by navigating to http://localhost:8080 on the host machine.
- When a request is sent to the host machine on port 8080, Docker forwards the traffic to the container’s internal port 80.
- The container processes the request and sends the response back to the host, which in turn forwards it to the client.
- #docker run -p 8080:80 -p 443:443 my_web_app
- A web server (HTTP on port 80)
- A secure web server (HTTPS on port 443)
- # docker run -p 8080:80
- Avoid Mapping Ports to Privileged Host Ports: Privileged ports (ports below 1024) are reserved for specific services (like HTTP on port 80 or HTTPS on port 443). It’s better to avoid mapping container ports to privileged host ports unless absolutely necessary.
- Limit Host Port Exposure: If possible, limit the number of ports exposed by the container. For example, only map ports that need to be accessible to the outside world, and keep internal communication within the container network.
- Use Docker Networks: Docker provides a networking feature that enables communication between containers on the same host or across hosts without exposing ports to the outside world. By using a custom network, containers can communicate securely, and unnecessary ports don’t need to be exposed.
- #docker network create my_network
- #docker run –network=my_network my_web_app
- Avoid Hardcoding Ports: In a production environment, avoid hardcoding host ports, especially for large-scale applications where scaling might require multiple containers. Instead, use dynamic port mapping or orchestration tools like Docker Compose or Kubernetes to handle port assignments.
- Firewalls and Access Control: To further secure your Docker containers, configure firewalls and set up proper access control mechanisms. Ensure that only trusted systems can access exposed container ports.
- Monitor and Log Network Traffic: It is essential to monitor the network traffic going to and from your Docker containers. By logging and analyzing traffic, you can identify potential security threats or performance bottlenecks.
Understanding these distinctions is key to setting up and managing port mappings effectively, as it ensures that the right applications are available on the correct network ports.
To Earn Your Cloud Computing Certification, Gain Insights From Leading Cloud Computing Experts And Advance Your Career With ACTE’s Cloud Computing Online Course Today!
Mapping Container Ports to Host Ports (-p flag)
Docker provides the -p or –publish flag to map container ports to host ports in Cloud Computing Courses. The basic syntax for port mapping is:
Where:
For example:
In this case:

Why Use Port Mapping?
Port mapping is a crucial feature in Docker that allows applications running inside containers to be accessed from external networks. When a containerized application, such as a web server, database, or API service, is deployed, it runs in an isolated environment by default. To make it accessible from the host machine or external users, port mapping is used to bind the container’s internal port to a specific port on the host system. This is done using the -p or –publish flag in the docker run command, a practice often emphasized in DevSecOps for secure container deployment. For example, docker run -p 8080:80 nginx maps port 80 of the container (where Nginx runs) to port 8080 of the host, making the service accessible via http://localhost:8080. One of the major advantages of port mapping is that it enables running multiple containers on the same host machine. Each container can be assigned a different host port, ensuring that multiple applications function without conflicts. This is particularly useful for microservices architecture, where different services run in separate containers but communicate efficiently. Additionally, Docker provides network isolation, ensuring that only explicitly mapped services are exposed. This improves security by preventing unauthorized access to internal services. Port mapping is essential for scaling applications, integrating with load balancers, and ensuring seamless service accessibility in production and development environments. Proper configuration enhances flexibility, security, and performance in containerized deployments.
Gain Your Master’s Certification in Cloud Computing by Enrolling in Our Cloud Computing Masters Course.
Exposing Multiple Ports and Using Different Protocols
In some cases, you may need to expose multiple ports for your application. Docker allows you to do this using the -p flag multiple times, a common practice in Cloud Technologies to ensure proper service connectivity. Each instance of the -p flag can map a different internal port to a corresponding host port.
-
Example:
Here, both ports 80 and 443 from the container are exposed on ports 8080 and 443 on the host, respectively. This can be useful when running services like:
Best Practices and Security Considerations
While Docker port mapping is a powerful feature, it’s important to follow best practices and security guidelines to ensure the safety and efficiency of your containerized applications, as highlighted in the Freshers Guide to Build a Strong DevOps Resume.
Use Explicit Port Binding: Always explicitly map the ports you need, rather than exposing all ports. This reduces the attack surface of your container and ensures that only necessary services are accessible from the outside.Avoid exposing unnecessary ports unless they are required by your application.

Preparing for Cloud Computing Job Interviews? Have a Look at Our Blog on Cloud Computing Interview Questions & Answer To Ace Your Interview!
Conclusion
Docker port mapping is a powerful tool that allows developers to expose containerized applications to the outside world. It enables applications inside containers to communicate with external systems, making them accessible over the network. By using the -p flag, developers can map container ports to specific ports on the host machine, ensuring seamless connectivity in Cloud Computing Courses. Understanding how to map and expose multiple ports is crucial for deploying multi-service applications, such as web servers, databases, and APIs. Port mapping can be done in different ways, including host port mapping, where a specific port is assigned on the host, and dynamic port mapping, where Docker assigns a random available port. However, it’s crucial to follow best practices, such as limiting exposed ports, using custom Docker networks, and ensuring proper security configurations, to maintain the integrity and security of the applications. Restricting access to only necessary ports and using firewall rules further enhances security. Docker port mapping is an essential concept for managing the networked communication of containers, whether for development, testing, or production environments. By properly configuring ports, developers can avoid conflicts, optimize performance, and create secure, scalable applications that integrate efficiently with external systems and services.


