Last updated on 20th Feb 2025| 5290
- Introduction
- What is Git and Why is it Important?
- System Requirements for Installing Git on Windows
- Step-by-Step Guide to Installing Git on Windows
- Configuring Git After Installation
- Common Troubleshooting Tips for Git Installation on Windows
- Using Git on Windows: The First Steps
- Conclusion
Git is an essential tool for modern software development and version control. It allows developers to track code changes, collaborate with others, and manage project histories. As one of the most popular version control systems, Git is used by developers worldwide for both personal and collaborative projects. If you’re a beginner or new to version control, installing Git on Windows can seem like a daunting task, but in reality, it’s an easy process that can be done in just a few steps. Taking Cloud Computing Courses can further enhance your understanding by showing how Git integrates with cloud-based environments, improving collaboration and version control in distributed teams. This guide walks you through the process of installing Git on Windows in 2024. From the basics of Git to step-by-step installation and troubleshooting, this blog will help you get started with Git and set up your development environment.
To Earn Your Cloud Computing Certification, Gain Insights From Leading Cloud Computing Experts And Advance Your Career With ACTE’s Cloud Computing Online Course Today!
Introduction
Git is an essential tool for developers, enabling efficient version control and collaboration on projects. Installing Git on Windows in 2024 is a straightforward process, allowing users to manage repositories, track changes, and work seamlessly with platforms like GitHub and GitLab. Whether you are a beginner or an experienced developer, having Git set up on your system is crucial for coding efficiency. This guide walks you through the step-by-step process of installing Git on Windows, including downloading the latest version, configuring essential settings, and verifying the installation. Additionally, integrating tools like AWS DataSync can help streamline the process of syncing and transferring your Git repositories across AWS environments, ensuring seamless data management. We will also cover key configurations such as setting up your username and email, integrating Git with popular code editors, and troubleshooting common issues. Ensuring a smooth installation of Git requires selecting the right options during setup, including configuring the command-line interface, enabling Git Bash, and choosing default branch names. By following these steps, you can successfully install and configure Git on Windows, streamlining your software development workflow.
What is Git and Why is it Important?
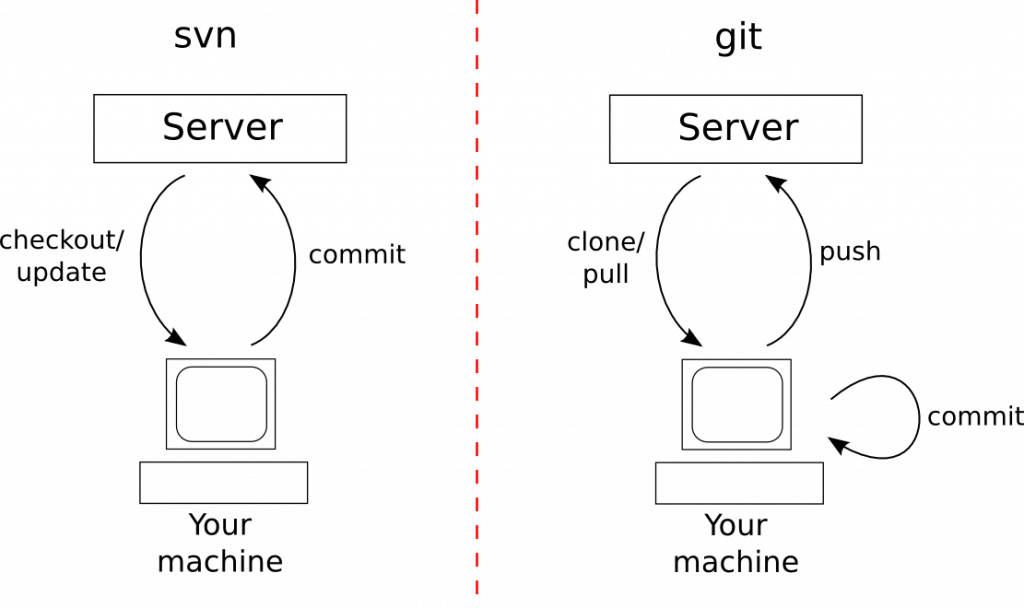
Git is a distributed version control system (VCS), meaning that it allows you to track changes in your codebase, collaborate with others, and manage multiple versions of your project over time. Unlike traditional version control systems, Git does not rely on a central server. Instead, every user has a full copy of the repository on their local machine. By leveraging tools like AWS SWF Scalable Workflow Automation, teams can automate and scale the workflow of managing Git repositories, ensuring efficient collaboration and process management in distributed environments. This setup enables faster operations, better collaboration, and greater control over the project history.
- Version Tracking: Git allows you to track the history of changes in your project, providing insight into what was changed and why.
- Collaboration: Multiple developers can work on the same project at the same time, and Git helps manage merging changes seamlessly.
- Branching and Merging: Git allows developers to create branches for new features or bug fixes, making it easier to work on multiple tasks simultaneously.
- Security: Each change made in a Git repository is recorded, and changes can be easily rolled back if necessary.
Git is used by virtually all developers and is supported by major code-hosting platforms like GitHub, GitLab, and Bitbucket. Mastering Git is crucial for anyone looking to work in modern software development, whether as a solo developer or part of a team.
Interested in Obtaining Your Cloud Computing Certificate? View The Cloud Computing Online Course Offered By ACTE Right Now!
System Requirements for Installing Git on Windows
Git is compatible with Windows 7 or later. If you are using Windows 7, 8, 10, or 11, you can install Git without any issues. Git works well with both 32-bit and 64-bit versions of Windows, although 64-bit is recommended for most modern systems. Git itself is a lightweight tool, taking up only around 200 MB of disk space for installation. However, the size of your Git repositories will depend on the projects you’re working on. Additionally, by Mastering Docker ENTRYPOINT, you can optimize the use of Git repositories in containerized environments, ensuring efficient and streamlined deployments. You’ll need additional space if you plan on working with large codebases or several repositories. An active internet connection is necessary for downloading the Git installer and using Git to interact with online repositories. You’ll need the internet to clone repositories or push and pull changes from platforms like GitHub or GitLab. While Git doesn’t have any specific hardware or software prerequisites, having a basic understanding of how to navigate your computer’s file system and using a command-line interface (CLI) will be helpful. However, Git’s user-friendly installation process doesn’t require advanced knowledge.

Step-by-Step Guide to Installing Git on Windows
Enrolling in Cloud Computing Courses can help you understand how Git integrates with cloud platforms, making it easier to manage and deploy code in cloud environments. The installation process for Git on Windows is quick and simple. Follow the steps below to install Git on your system:
Step 1: Download the Git Installer- Visit the official Git website: Open your browser and go to https://git-scm.com/.
- Download the Windows version: On the homepage, you’ll see a prominent button that says “Download for Windows.” Click it to download the latest version of Git for your system. Step 2: Run the Git Installer
- Launch the installer: Locate the .exe file you downloaded and double-click on it to run the installer.
- Follow the on-screen prompts: The installer will guide you through a series of steps. Most of the default options work for the majority of users, but you can customize certain settings
- Choose the installation path: The default location is usually fine, but you can change it if needed.
- Select additional components: These include options like adding Git Bash or creating desktop shortcuts.
- Set up the default text editor: By default, Git uses Vim as the editor for writing commit messages, but you can change this to a text editor you prefer (e.g., Notepad++ or Visual Studio Code).
- Configure your PATH: You will be asked how to add Git to the system PATH. The recommended option is to select “Use Git from the command line and also from 3rd-party software”.
- Complete the installation: After making your selections, click the “Install” button. The installation process will begin, and it should only take a few minutes to finish. Step 3: Verify the Installation
- Open Git Bash: This is a terminal window that you will use to interact with Git.
- Check the installed version: In Git Bash, type git –version to verify that Git was installed successfully. If everything is correct, you should see the version number of Git displayed. At this point, Git is installed on your Windows machine and ready to use.
- User name: Enter your full name.
- Email address: Enter your email address (the one associated with your GitHub or GitLab account). Configure Your Default Editor
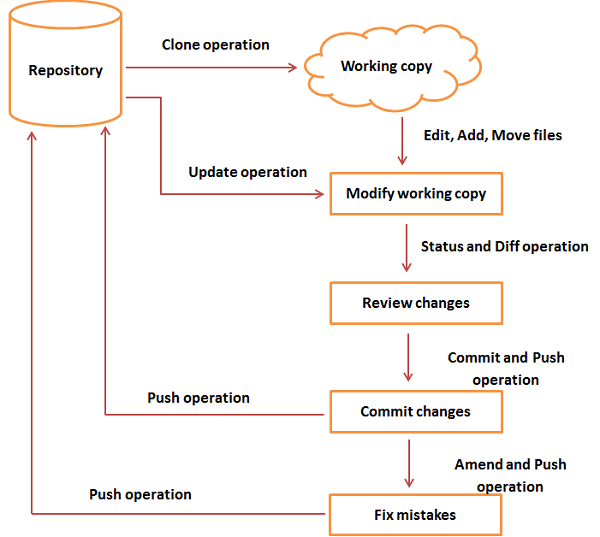
- Create a New Repository: If you want to start a new project, you can create a Git repository by navigating to the folder where your project is located and initializing a new repository. This allows Git to start tracking changes in the project. Additionally, using Docker Port Mapping can help expose your application’s ports to the host system, enabling seamless interaction with the project while you manage version control with Git.
- Clone an Existing Repository: To work on an existing project, you can clone a repository from platforms like GitHub, GitLab, or Bitbucket. Simply find the repository’s URL and use it to clone the project to your local machine.
- Make Your First Commit: Once you’ve made changes to files in your project, you can commit those changes to Git. A commit captures the changes in your project, allowing you to track them over time.
- Push Changes to a Remote Repository: If you’re collaborating with others, you’ll need to push your changes to a remote repository so your collaborators can see them. Pushing sends your commits to the online repository.
Once the installation is complete, you need to verify that Git was successfully installed:
Looking to Master Cloud Computing? Discover the Cloud Computing Masters Course Available at ACTE Now!
Configuring Git After Installation
Set Up Your Name and Email AddressGit requires you to set up your name and email address, which will be associated with your commits. These details allow others to identify who made specific changes to the codebase. To configure your name and email, open Git Bash and use the following commands:
You can also set the default text editor Git will use when committing changes. By default, Git uses Vim, but you can choose another editor like Visual Studio Code or Notepad++ based on your preference. Additionally, incorporating Efficient Automation in Jenkins With Docker can enhance your workflow by automating Git-related tasks and ensuring consistent environments for your development and deployment processes. Verify Your Configuration to ensure that your configurations were saved, you can check your settings using the command git config –list. This will display a list of your settings, including your name and email.
Common Troubleshooting Tips for Git Installation on Windows
While the installation process is generally smooth, you may encounter some common issues. Here are a few troubleshooting tips to resolve them.If Git Bash doesn’t launch, try reinstalling Git and ensuring that the appropriate installation options are selected during the setup process. Running the installer as an administrator can also help resolve this issue.Git is Not Recognized in the Command Prompt. If Git commands aren’t working in the command prompt, it might be because Git wasn’t added to your system’s PATH variable. During installation, ensure that you select “Use Git from the command line and also from 3rd-party software” to make Git available globally. If the installation freezes, it could be due to antivirus software or system restrictions. Disable any antivirus software temporarily, or try running the installer as an administrator. Unable to Clone Repositories Ensure that your internet connection is active and stable. Double-check the URL of the repository you’re trying to clone. If you’re using HTTPS, make sure your credentials are entered correctly.
Using Git on Windows: The First Steps
Preparing for Cloud Computing Job Interviews? Have a Look at Our Blog on Cloud Computing Interview Questions & Answer To Ace Your Interview!
Conclusion
Installing Git on Windows is a straightforward process that can enhance your development workflow. Whether you’re new to version control or looking to integrate Git into your projects, this guide provides the necessary steps to get Git up and running on your machine. By following the instructions, you will not only install Git but also configure it to fit your specific development needs. Additionally, Cloud Computing Courses can provide valuable knowledge on how to leverage cloud-based Git repositories and version control systems, enhancing collaboration and scalability in your development process. Once Git is installed and configured, you can start managing your code, collaborating with others, and developing more efficiently. Git is a powerful tool that is essential for any developer in 2024, and mastering it will open up many opportunities in the world of software development.