Last updated on 25th Feb 2025| 5397
- Understanding AWS EC2 and Terraform
- Setting Up AWS Account and Access Key
- Installing and Configuring Terraform
- Creating a Terraform Project
- Writing Infrastructure as Code with Terraform
- Initializing and Applying the Terraform Configuration
- Managing and Modifying Your EC2 Instance
- Destroying the EC2 Instance with Terraform
- Best Practices for Terraform and AWS EC2
- Terraform Code Modularization
- Troubleshooting Common Issues
- Conclusion
Understanding AWS EC2 and Terraform
What is AWS EC2?AWS EC2 instances come in various types, each optimized for different use cases, such as compute-intensive tasks, memory optimization, or storage needs. You can launch instances in different geographical regions, ensuring low-latency access to your applications for users worldwide. EC2 also integrates with other AWS services, like Amazon S3 for storage, Amazon RDS for databases, and AWS Lambda for server-less computing, enhancing its versatility. EC2 instances are billed based on usage, allowing businesses to manage costs effectively. Additionally, EC2 supports auto-scaling, so your infrastructure can adjust automatically to traffic spikes or drops, providing high availability and performance.
What is Terraform?With Terraform, you can define your infrastructure in configuration files, which can then be versioned and shared, ensuring consistency and reproducibility across different environments. AWS Training supports a wide range of cloud providers, including AWS, Azure, and Google Cloud, making it a versatile tool for multi-cloud architectures. Terraform also allows for the management of resources beyond cloud services, such as DNS, monitoring tools, and even on-premises resources. By using Terraform’s state management, you can track resource changes over time and ensure that the deployed infrastructure matches the desired configuration. Additionally, Terraform’s plan and apply commands help preview and safely implement changes, reducing the risk of unintended modifications.
Benefits of using Terraform with AWS EC2
- Infrastructure as Code (IaC): Terraform enables infrastructure to be managed using code, which allows you to describe your EC2 instances and resources in a declarative manner. This approach improves repeatability and consistency across environments.
- Multi-Cloud Support: Terraform supports multiple cloud providers (e.g., AWS, Azure, Google Cloud Platform), so you can use the same tool to manage EC2 instances across different platforms, making it ideal for hybrid or multi-cloud environments.
- State Management: Terraform maintains the state of your infrastructure, which allows it to detect any changes or drifts in your EC2 instances or associated resources. This helps in ensuring the actual infrastructure matches the declared desired state.
- Resource Dependency Management: Terraform automatically handles the dependencies between resources. For example, if you are provisioning an EC2 instance and an associated security group, Terraform ensures the security group is created before the instance, preventing configuration errors.
- Scalability and Flexibility: Terraform can manage complex, scalable architectures by allowing you to define scaling rules, auto-scaling groups, and other dynamic features within your EC2 infrastructure, all with minimal manual intervention.

Setting Up AWS Account and Access Key
Programmatically interacting with AWS resources requires that you first create an AWS account and then implement API access using the Azure Sandbox all the Information You Need.
Step-by-step guide to setting up an AWS account
- Visit the AWS Website: Go to AWS’s official website to begin the process.
- Click on ‘Create an AWS Account’: On the homepage, click on the “Create an AWS Account” button. This will redirect you to the sign-up page.
- Enter Your Email and Set Up a Password: Provide a valid email address and create a secure password for your new AWS account.
- Enter Your Contact Information: Fill in your personal or company contact information. This will include your name, address, and phone number.
- Add Payment Information: You will need to enter valid payment information (credit or debit card) to verify your identity and to be billed for any paid services beyond the Free Tier.
- Complete Identity Verification: AWS will ask you to verify your identity by providing a phone number. You will receive a phone call or SMS with a verification code to confirm your identity.
- Choose Your Support Plan: Select a support plan for your account. AWS offers multiple support levels, but for new users, the Basic Support plan (free) is often sufficient to start.
- Access the Free Tier and Explore Services: Once your account is set up, you can access AWS services, including the Free Tier, which gives you free usage of limited resources such as EC2, S3, and more, for a limited time.
Unlock your potential in AWS with thisAWS Certification Training .
How to create an AWS Access Key
Open the AWS Management Console by going to aws.amazon.com and logging into your account. In the AWS Management Console, type “IAM” in the search bar and select “IAM” from the dropdown to access the Identity and Access Management service. In the IAM dashboard, click on the “Users” option in the left-hand navigation menu. From the list of IAM users, click on the name of the user for which you want to create an access key. Once your user account page is open, click on the “Security credentials” tab to manage your user’s security settings. Scroll down to the “Access keys” section, where you will manage your user’s access keys. Click the “Create access key” button to generate a new access key for your IAM user. AWS will display the access key ID and the secret access key. Download this information by clicking the “Download .csv file” option or manually copying them for safekeeping. The secret access key is only shown once. Make sure to store the access key ID and secret access key in a secure location, such as a password manager or encrypted storage. If the access key is intended for programmatic access (e.g., using AWS CLI or SDKs), ensure that the IAM user has the appropriate permissions (e.g., Admin, EC2FullAccess) associated with their account.
Configuring AWS CLI with the access key
To install the AWS CLI, follow these steps: Install AWS CLI:On Linux/macOS: Use curl or pip.
- curl “https://awscli.amazonaws.com/awscli-exe-linux-x86_64.zip” -o
- “awscliv2.zip”
- unzip awscliv2.zip
- sudo ./aws/install
On Windows, download the installer from the AWS CLI website.
Configure the AWS CLI: Run aws configure in your terminal. Enter your AWS Access Key ID, Secret Access Key, preferred region (e.g., us-east-1), and output format (e.g., json). This saves the configuration to a local profile.
To install and configure the AWS CLI, you first need to download and install it. On Linux or macOS, you can use a terminal command like curl to download the installation package, then unzip and install it using the appropriate commands. On Windows, you can simply download the installer from the official AWS CLI website and run it. Once the AWS CLI is installed, use the aws configure command to set up your credentials. This will prompt you to enter your AWS Access Key ID and Secret Access Key, which you obtain from your AWS account. You will also be asked to specify your preferred AWS region (for example, us-east-1) and output format (such as json). These settings are saved locally to a configuration file on your machine, allowing the CLI to interact with AWS services using your credentials and configuration preferences.
Installing and Configuring Terraform
Terraform installation guide for different OS- Linux: Download the Terraform binary for your architecture and extract it to /usr/local/bin.
- MacOS: Use Homebrew to install Terraform: brew install terraform.
- Windows: Download the Terraform zip and extract it to a folder of your choice, adding it to the PATH.
Verifying installation
Run the command:
- terraform –version
It should display the installed Terraform version.
Configuring the Terraform environment
Create a folder for your Terraform project and navigate to it:
- mkdir my-terraform-project
- cd my-terraform-project
To install Terraform, the process differs by operating system. On Linux, download the appropriate binary, extract it to /usr/local/bin to make it globally accessible. On macOS, use Homebrew with brew install terraform. On Windows, download the ZIP file, extract it, and add the folder to your system’s PATH. After installation, verify it by running terraform –version. To configure your environment, create a project directory using mkdir my-terraform-project and navigate into it with cd my-terraform-project. This directory will contain your Terraform configuration files for managing infrastructure resources.

Creating a Terraform Project
To set up the Terraform directory structure and initialize the project, follow these steps:
Create the Project Directory:
You can start by creating a directory for your Terraform project:
- mkdir my-terraform-project
- cd my-terraform-project
Set Up the File Structure:
Create the three required files within your project directory:
- touch main.tf variables.tf outputs.tf
- main.tf: This is where you will define your Terraform configuration (resources, providers, etc.).
- variables.tf: In this file, you will define any variables that your Terraform configurations need.
- outputs.tf: This is where you define the output values of your configuration, such as the resource IDs or IP addresses of created resources.
- Example Content for the Files:
- main.tf:
- provider “aws” {
- region = “us-west-2”
- }
- resource “aws_instance” “example” {
- ami = “ami-0c55b159cbfafe1f0”
- instance_type = “t2.micro”
- }
- variables.tf (optional, used if you need variables):
- variable “instance_type” {
- description = “Type of EC2 instance”
- default = “t2.micro”
- }
- variable “ami” {
- description = “AMI ID for the EC2 instance”
- default = “ami-0c55b159cbfafe1f0”
- }
- outputs.tf:
- output “instance_id” {
- value = aws_instance.example.id
- }
- terraform init
- By setting this up, your directory structure would look like this:
- my-terraform-project/
- ├── main.tf
- ├── variables.tf
- └── outputs.tf
- resource “aws_security_group” “allow_ssh” {
- name = “allow_ssh”
- description = “Allow SSH access from my IP”
- ingress {
- from_port = 22
- to_port = 22
- protocol = “tcp”
- cidr_blocks = [“your-ip-address/32”] # Replace with your own IP
- }
- egress {
- from_port = 0
- to_port = 0
- protocol = “-1”
- cidr_blocks = [“0.0.0.0/0”]
- }
- }
- Security Group (aws_security_group): This resource defines a security group that allows inbound SSH traffic on port 22 from a specific IP address and allows all outbound traffic. You would need to replace “your-ip-address/32” with your actual IP address (or a range of addresses).
- SSH Key Pair (aws_key_pair): The key pair is created using a public key file, which allows you to SSH into your EC2 instance securely. The key pair is referenced in the EC2 instance configuration.
- EC2 Instance (aws_instance): The EC2 instance is created with the specified AMI and instance type. It is linked to the defined security group (to control access) and SSH key pair (for secure login).
- terraform init: Initializes the working directory containing Terraform configuration files.
- terraform apply: Applies the configuration to provision the resources.
- terraform validate: Validates the configuration files.
- terraform plan: Shows a preview of the changes Terraform will make.
- terraform show: Displays the current state of the resources.
- terraform destroy: Destroys the infrastructure managed by Terraform.
- terraform output: Displays the output values defined in outputs.tf.
- terraform state: Allows you to interact with the Terraform state file.
- terraform import: Imports an existing resource into Terraform management.
- terraform taint: Marks a resource to be recreated on the next terraform apply.
- terraform apply
- Preparation: Before running terraform destroy, ensure that you no longer need the resources you created. This command will permanently delete all the infrastructure managed by Terraform within your current working directory.
- Command Usage: Run terraform destroy in your terminal. This will prompt Terraform to read the current state and determine which resources are associated with the configuration in your .tf files.
- Confirmation: Terraform will display a plan showing the resources that will be destroyed. You will be asked to confirm by typing “yes” before proceeding. This gives you a chance to review and prevent accidental destruction.
- State Update: After confirmation, Terraform will update the state file to reflect the destruction of the resources. The actual deletion is done through API calls to the cloud provider (e.g., AWS Elasticsearch ) to terminate instances, delete volumes, security groups, etc.
- Partial Destroy: If you only want to destroy specific resources rather than the entire infrastructure, you can use the -target flag followed by the resource name (e.g., terraform destroy -target=aws_instance.example).
- Verification: After the destruction process is complete, check your cloud provider’s console (e.g., AWS Management Console) to ensure that all resources have been removed as expected. If something was missed, you can run the terraform destroy command again to clean up the remaining resources.
- Modularization Overview: Modularization in Terraform is the practice of breaking down large infrastructure setups into smaller, reusable components called modules. Each module is a collection of resources defined in separate files, making the code easier to manage and scale.
- Separation of Concerns: By dividing infrastructure into logical components (e.g., networking, compute, storage), you can isolate different responsibilities and make the code more readable and maintainable.
- Reusability: Modules are reusable, meaning you can use them across multiple environments or projects. This reduces code duplication and ensures consistency in your infrastructure.
- Parameterization: Modules can be parameterized with input variables, allowing you to pass different values when instantiating them. This makes modules flexible and adaptable to different use cases.
- Outputs: Modules can define output variables to pass information back to the root module. This helps share key data between modules, like instance IDs or IP addresses, making your code more dynamic and interconnected.
- Versioning of Modules: To avoid breaking changes, you can version your modules and use specific versions in your main.tf or other modules. This allows you to maintain stability while making improvements.
- Centralized Management: You can store modules in a centralized location (e.g., a Git repository, Terraform Registry, or a shared repository) for easy access and version control, allowing multiple users to reuse modules efficiently.
- Best Practices for Modularization: Follow best practices like using clear naming conventions, organizing modules by resource type or functionality, and including documentation within each module to make them easier to use and understand.
- Complex Infrastructure: For complex infrastructures, you might have modules that represent entire environments, such as a vpc module, a Top Cloud Databases , or an app_server module. These can be composed into larger configurations, improving readability and maintainability.
- Collaboration and Scaling: By modularizing your Terraform code, you can improve collaboration in a team setting, since different team members can work on different modules independently without stepping on each other’s toes. This also helps when scaling up infrastructure across various environments and regions.
Initialize the Terraform Project:
Run the following command to initialize the working directory:
This command downloads the required provider plugins and sets up the necessary directories for Terraform to function.
Terraform Initialization :
After running terraform init, Terraform will initialize your project, download the AWS provider, and prepare it to manage your infrastructure.
Once that’s done, you can apply the configuration with terraform to create the resources defined in main.tf.
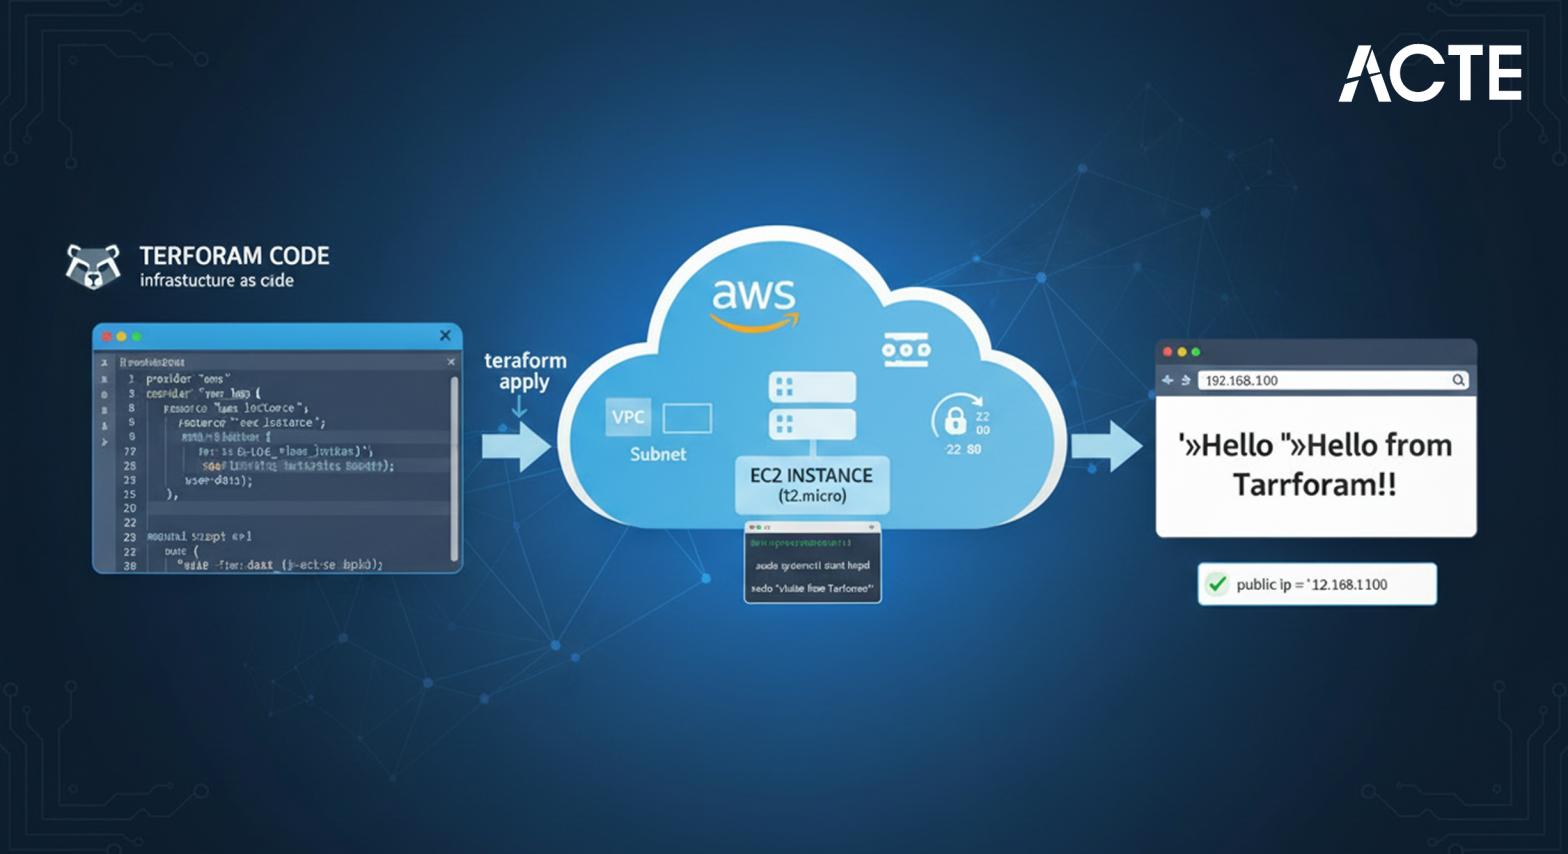
Writing Infrastructure as Code with Terraform
When provisioning an EC2 instance using Terraform, security and access configuration is crucial to ensure your instance is both protected and accessible. This is typically achieved by defining security groups and SSH key pairs.
Security Groups:
A security group in AWS acts as a virtual firewall to control inbound and outbound traffic to your EC2 instances. By default, EC2 instances have no open ports for inbound traffic, and you can modify the security group rules to allow specific types of traffic, like HTTP (port 80), HTTPS (port 443), or SSH (port 22) for remote access. In the Terraform configuration, you would define a security group to allow the necessary traffic. For example, if you want to allow SSH access from your IP, you could configure it as follows:
Here, cidr_blocks for SSH access would be your IP address, and the egress block allows all outbound traffic.
Explanation:
By adding these components—security groups and key pairs—you ensure that your EC2 instance is both accessible (via SSH) and secure (only allowing authorized users and traffic). This setup is fundamental for managing cloud resources safely.
Become a AWS expert by enrolling in this AWS Certification Training today.
Initializing and Applying the Terraform Configuration
These commands cover the key aspects of working with Terraform, from initialization to resource management and troubleshooting.
Managing and Modifying Your EC2 Instance
Once your EC2 instance is created, you may need to modify it. Update the configurations in main.tf and reapply them using:
Before applying changes, it’s a good practice to run terraform plans. This command shows a preview of the changes that will be made, helping you to confirm that the changes are as expected before applying them. Terraform keeps track of the infrastructure’s current state in a state file (terraform.tfstate). If you make changes to your configuration, Terraform will compare this state file with the updated main.tf to determine what needs to be altered or created.Some changes, like modifying certain parameters (e.g., instance type), may require the resource to be destroyed and re-created. Terraform will handle this process and notify you if it’s necessary.For large infrastructure, you may want to break your main.tf into smaller, reusable modules. This allows for better organization and reusability across different environments or projects.If you are working in a team, you may want to use remote state backends (like S3) to store the Terraform state file. This ensures that multiple team members can collaborate on infrastructure changes without conflicts.
Destroying the EC2 Instance with Terraform
To destroy an EC2 instance and any other resources created by Terraform, you can use the terraform destroy command. Here’s a breakdown of the process in six points:
Best Practices for Terraform and AWS EC2
Terraform uses state files (terraform.tfstate) to track the resources it manages. This file maps resources to their real-world counterparts. If the state is lost or corrupted, Terraform may not correctly manage the infrastructure. Storing state files locally can lead to issues when collaborating with AWS Training . Remote backends like AWS S3, Terraform Cloud, or other cloud storage options ensure that the state file is accessible and consistent for all team members. Remote state backends enable centralized management of state files, ensuring that teams can collaborate without conflicting changes. They also allow the use of state locking (e.g., via DynamoDB with AWS S3) to prevent multiple users from modifying state simultaneously. AWS S3 is a popular choice for storing Terraform state. By using an S3 bucket and enabling versioning, you can preserve history, easily recover from errors, and keep track of state changes over time. Terraform Cloud is a managed service that offers remote state storage along with team collaboration features.
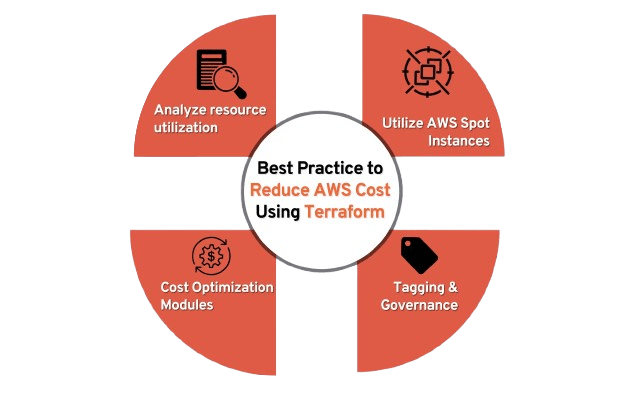
It also provides state versioning, automatic locking, and easy integration with CI/CD pipelines. Using backends like AWS S3 with DynamoDB for locking ensures that only one user can modify the state at any time, preventing conflicts and inconsistencies in the infrastructure. State files may contain sensitive information, such as resource IDs, credentials, or passwords. When using remote backends, ensure the state file is encrypted in transit (using HTTPS) and at rest (using server-side encryption in S3, for example).You can run terraform state commands to manipulate and inspect the state file, such as moving resources between modules (terraform state mv), removing resources (terraform state rm), or listing state contents (terraform state list).To manage different environments (e.g., dev, staging, production), you can use separate state files. This can be done by configuring different backends or using workspace-based setups in Terraform Cloud.With remote backends like S3 or Terraform Cloud, you can automate backups and version history of state files. This helps protect against accidental deletions or modifications.
Ready to excel in AWS? Enroll in ACTE’s AWS Master Training Course and begin your journey today!
Terraform Code Modularization
By managing state files remotely and modularizing Terraform code, you can create more secure, maintainable, and scalable infrastructure setups that are easier to collaborate on and scale over time.
Want to ace your AWS interview? Read our blog on AWS Interview Questions and Answers now!
Troubleshooting Common Issues
Ensuring proper IAM permissions and addressing configuration errors are essential for successful infrastructure management with Terraform. IAM permissions should be set correctly to allow actions like ec2:RunInstances and ec2:DescribeInstances. Additionally, IAM users must have access to all relevant AWS services (e.g., S3, RDS), and any deny statements in policies must be resolved. For resources across multiple AWS accounts, cross-account permissions are necessary. Users must also have permissions for VPC resources, and enabling Google Cloud Platform helps troubleshoot IAM issues. The IAM Policy Simulator can be used to test permissions.On the Terraform configuration side, running terraform validate helps identify syntax errors. Managing resource dependencies with depends_on or implicit references ensures the correct order of provisioning. terraform plan allows you to preview changes before applying them, reducing misconfigurations. Check for module compatibility and ensure proper setup of input/output variables to avoid issues. If the state file is out of sync with the infrastructure, use terraform refresh. Finally, ensure compliance with resource limits to prevent failures during provisioning. Properly managing IAM permissions and configuration helps ensure a smooth Terraform deployment.
Conclusion
You can drastically lower the possibility of human mistakes and manual intervention by using Terraform to automate the creation and maintenance of AWS EC2 instances. By enabling you to specify your infrastructure as code, Terraform guarantees consistency and reproducibility in the provisioning procedure. By facilitating version control, simple replication, and smooth EC2 instance scaling across environments, this method improves efficiency. Furthermore, Terraform’s declarative configuration model streamlines resource management and updates, which makes it simpler to monitor infrastructure modifications and sustain desired states over time. In the end, AWS Training automation reduces operational overhead and guarantees quicker deployments. Additionally, Terraform’s ability to integrate with various AWS services allows for seamless infrastructure management. You can define security groups, networking configurations, and storage options within the same configuration file, enabling more cohesive and manageable setups. The use of modules in Terraform also promotes reusability, making it easy to replicate or modify configurations across different projects. As a result, teams can focus more on development and innovation while reducing the manual effort needed for infrastructure management. Overall, Terraform enhances collaboration between teams by providing a clear, standardized approach to infrastructure provisioning.