Last updated on 07th Mar 2025| 5616
- Introduction to Azure PowerShell
- Setting Up and Installing Azure PowerShell
- Managing Azure Resources with PowerShell
- Automating Azure Tasks
- Working with Azure Storage and Virtual Machines
- Scripting Best Practices in Azure PowerShell
- Security and Role-Based Access Control (RBAC)
- Conclusion
Introduction to Azure PowerShell
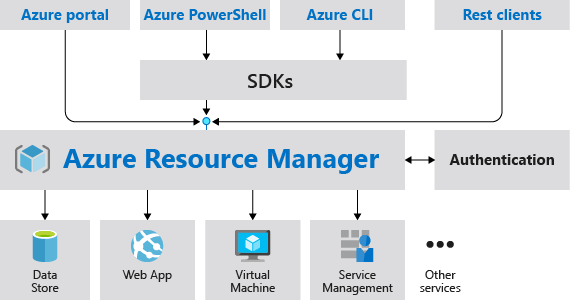
Azure PowerShell is a powerful command-line tool for managing and automating tasks in Microsoft Azure. Built on top of PowerShell, it provides an interface for interacting with Azure resources, simplifying the management of services such as virtual machines, databases, networks, and storage. Windows Powershell Training . allows administrators and developers to automate complex tasks, control cloud resources, and handle deployment scripts, making it an essential tool for cloud operations and DevOps.Azure PowerShell is part of the Azure SDK (Software Development Kit) and can be installed locally on Windows, macOS, and Linux machines. It uses cmdlets (pronounced “command-lets”), specialized commands designed to manage Azure resources efficiently. This guide covers setting up Azure PowerShell, managing resources, automating tasks, and more to help you get the most out of this tool.
Setting Up and Installing Azure PowerShell
Prerequisites
Before you can use Azure PowerShell, you must ensure your environment is ready for installation. Here’s what you need:
- A Microsoft Azure account with sufficient permissions to manage resources.
- PowerShell version 5.1 or higher (pre-installed on Windows, or you can install it on macOS/Linux).
- An internet connection is needed to download the Azure Availability Sets vs Zones.
Installation Process
On Windows
Install via PowerShell Gallery: The recommended method for installing Azure PowerShell is through the PowerShell Gallery.
Open PowerShell as an Administrator.
Run the following command to install the Azure PowerShell module:
- Install-Module -Name Az -AllowClobber -Force -Scope CurrentUse
The -AllowClobber flag ensures the latest versions of dependencies are installed, and -Scope CurrentUser ensures it’s installed only for your user.
Verify Installation: Once installed, you can verify the installation by running:
- Get-Module -Name Az -ListAvailable
This command will list all available versions of the Azure PowerShell module.
On macOS/Linux
Install Homebrew (for macOS) or Snap (for Linux) if they’re not already installed.
Use Homebrew to install Azure PowerShell:
- Brew install –cask azure-PowerShell
For Linux, you may need to use the following commands based on the distribution:
- Sudo snap install PowerShell –classic.
Update Azure PowerShell
To keep your installation up-to-date, you can periodically update the Azure PowerShell module by running:
- Update-Module -Name Az
Connecting to Azure
Once installed, you need to authenticate to Azure to manage resources. To connect, use the following command:
- Connect-account
This will open a login prompt where you can provide your Azure account credentials. If you’re working with multiple subscriptions, you can select the desired subscription using:
- Select-AzSubscription -SubscriptionId
Managing Azure Resources with PowerShell
Once you’re authenticated, you can begin managing Azure resources using Azure PowerShell, which enables tasks such as creating virtual machines (VMs), managing storage accounts, handling networking resources, and more. For instance, you can create a VM with the command New-AzVM -ResourceGroupName “MyResourceGroup” -Name “MyVM” -Location “East US” -Image “Win2019Datacenter”. To start or stop a VM, use Start-AzVM or Stop-AzVM commands. To list VMs, you can simply use Get-AzVM. For storage accounts, you can create one using New-AzStorageAccount -ResourceGroupName “MyResourceGroup” -Name “my storage account” -Location “East US” -SkuName “Standard_LRS” and list them with Get-AzStorageAccount. Resource groups, which are logical containers for Azure resources, can be managed with New-AzResourceGroup to create and Get-AzResourceGroup to list. Networking resources such as virtual networks can also be managed with commands like New-AzVirtualNetwork -ResourceGroupName “MyResourceGroup” -Location “East US” -Name “MyVNet” -AddressPrefix “10.0.0.0/16”. Understand Azure API Management offers a unified way to manage your cloud infrastructure, ensuring consistency and reducing manual configuration errors. It provides a programmatic approach to automate repetitive tasks, making it easier to scale resources based on demand. Additionally, by leveraging Azure PowerShell, you can integrate with other automation tools to further streamline your workflows. Regular updates from Microsoft ensure that the cmdlets and modules are aligned with new Azure features and services, helping you stay current. By adopting Azure PowerShell, you can significantly enhance your ability to manage large-scale cloud environments efficiently.
Start your journey in Powershell by enrolling in this Powershell Training .
Automating Azure Tasks
Azure PowerShell is an excellent tool for automating repetitive tasks. By writing PowerShell scripts, you can automate the creation, configuration, and management of Azure resources, making it easier to manage your cloud environment at scale. Additionally, it enables you to automate the deployment of resources across multiple regions, ensuring consistency in your infrastructure. With Azure PowerShell, you can integrate resource provisioning with CI/CD pipelines, streamlining the development and deployment process. It also allows for the automation of routine maintenance tasks, such as scaling and patching, improving operational efficiency. Windows Powershell Training provides robust error handling and logging features, helping you track and troubleshoot any issues in your scripts. Moreover, its compatibility with Azure Resource Manager (ARM) templates allows for easier management of complex infrastructure setups, making it a powerful tool for managing cloud resources.
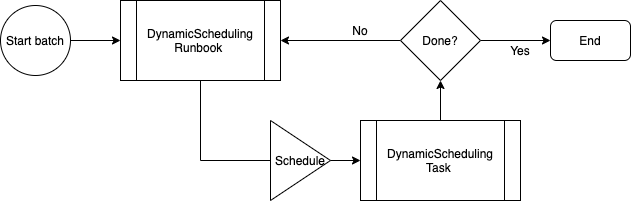
Scheduling Tasks with Azure Automation
Azure Automation can be used for patch management, ensuring that your systems are up-to-date with the latest security patches. It enables the automation of resource scaling, helping maintain the optimal performance of your applications while reducing unnecessary costs. You can also automate resource provisioning, such as creating new VMs or storage accounts based on predefined conditions. Azure Data Box Secure Data Transfer Solution provides the ability to monitor and respond to system events automatically, enhancing operational efficiency and reducing the need for manual intervention. Furthermore, it supports integrating with other Azure services, allowing for complex workflows, such as coordinating backups, monitoring, and security checks across multiple resources. Azure Automation can also be used to streamline governance and compliance tasks by running regular security audits and enforcing policies automatically. Lastly, it can help with user management tasks, such as creating or disabling accounts based on specific schedules or events.
Start your journey in Powershell by enrolling in this Powershell Training .
Example Automation Script
# Example script to stop VMs in a resource group after working hours
- $resourceGroupName = “MyResourceGroup”
- $virtualMachines = Get-AzVM -ResourceGroupName $resourceGroupName
- for each ($vm in $virtualMachines) {
- Stop-AzVM -ResourceGroupName $resourceGroupName -Name $vm.Name
- -Force
- }
This script will stop all VMs in a given resource group and can be scheduled to run automatically.

Working with Azure Storage and Virtual Machines
Azure PowerShell simplifies the management of storage accounts and virtual machines. For storage, you can easily create containers, upload/download files, and manage blobs. Additionally, you can manage storage account properties, such as changing the replication type or configuring access tiers for cost optimization. With Azure PowerShell, you can also automate the process of cleaning up old files or blobs, ensuring efficient storage management. Automate Security With Azure Sentinel enables the configuration of access policies and permissions for secure data access. Lastly, you can monitor storage account usage and performance, ensuring that your storage resources are being utilized effectively and remain cost-efficient.
Managing Storage Accounts and Blobs
Upload a file to a storage account:
- $context = New-AzStorageContext -StorageAccountName “my storage
- account” -StorageAccountKey “your_account_key”
- Set-AzStorageBlobContent -File “C:\path\to\your\file.txt” -Container
- “container” -Blob “file.txt” -Context $context
List Blobs in a container:
- Get-AzStorageBlob -Container “container” -Context $context
Managing Virtual Machines (VMs)
PowerShell provides various cmdlets for VM management:
- Set-AzVMSize -ResourceGroupName “MyResourceGroup” -VMName
- “MyVM” -Size “Standard_D2_v3”
- New-AzVM -ResourceGroupName “MyResourceGroup” -Location “East US”
- -Name “CustomVM” -Image “CustomImage”
Configure VM size:
Create a VM from a custom image:
Scripting Best Practices in Azure PowerShell
When scripting with Understanding Azure Load Balancer, following best practices is essential to ensure your scripts are efficient, maintainable, and secure. First, always use the principle of least privilege by assigning the minimal permissions needed for the task at hand. This reduces security risks and limits potential damage from accidental or malicious actions. Second, make use of parameterized scripts to increase reusability and flexibility, allowing scripts to work across different environments or resource groups. Third, implement error handling to catch and log any issues that may arise during script execution, ensuring smooth automation. Fourth, modularize your scripts by breaking them into reusable functions, which makes them easier to maintain and debug. Finally, regularly update and version your scripts to ensure they are compatible with the latest Azure PowerShell modules and best practices, ensuring optimal performance and security.
Looking to master Cloud Computing? Sign up for ACTE’s Cloud Computing Master Program Training Course and begin your journey today!
Use Parameters for Flexibility
Instead of hardcoding values, use parameters in your scripts to allow for dynamic input.
- param(
- [string]$ResourceGroupName,
- [string]$Location
- )
- New-AzResourceGroup -Name $ResourceGroupName -Location $Location
Modularize Your Scripts
Break your script into reusable functions. This helps with maintainability and readability.
- function Create-VM {
- param($VMName, $ResourceGroupName, $Location)
- New-AzVM -Name $VMName -ResourceGroupName $ResourceGroupName
- -Location $Location
- }
Use Error Handling
Use Try-Catch blocks to handle errors gracefully and provide meaningful feedback.
- Try {
- New-AzVM -Name “MyVM” -ResourceGroupName “MyResourceGroup”
- -Location “East US”
- } Catch {
- Write-Host “An error occurred: $_”
- }
Logging and Output
Consider logging the output of your scripts, especially for production environments, to help track operations and troubleshoot issues later.
- $logFile = “C:\scripts\log.txt”
- Start-Transcript -Path $logFile
- # Your script actions here
- Stop-Transcript
Security and Role-Based Access Control (RBAC)
Azure PowerShell integrates seamlessly with Azure’s Role-Based Access Control (RBAC) system, enabling administrators to manage access and permissions effectively. With RBAC, you can assign specific roles to users, groups, and applications, ensuring they only have access to the resources they need. Azure key Vault Secure your Sensitive Data fine-grained control helps prevent unauthorized actions and improves security within your Azure environment. Using Azure PowerShell, you can easily assign, remove, or modify roles through commands like New-AzRoleAssignment or Get-AzRoleAssignment. Implementing RBAC within your automation scripts ensures compliance with the principle of least privilege and provides better auditing and monitoring capabilities.
Preparing for Powershell interviews? Visit our blog for the best Powershell Interview Questions and Answers!
Assigning Roles : You can use the New-AzRoleAssignment cmdlet to assign roles to users or groups:
- New-AzRoleAssignment -ObjectId “
” -RoleDefinitionName - “Contributor” -ResourceGroupName “MyResourceGroup”
Managing Permissions : To view current role assignments, use:
- Get-AzRoleAssignment
Solving Typical Problems : It’s critical to understand how to handle typical issues when using Azure PowerShell. Among the frequent problems are:
Errors in authentication: Make sure you’re using Connect-AzAccount to log into the appropriate Azure account.
Missing Modules: Use Install-Module -Name Az -Force to install all necessary modules.
Problems with Permissions: Verify that you have the required permissions for the resource or activity you are attempting to perform.
Network Connectivity: Ensure you have internet access and can connect to Azure.
Use the -Debug parameter to get additional output and insights into what’s happening behind the scenes.
- Get-AzVM -ResourceGroupName “MyResourceGroup” -Name “MyVM” -Debug
Conclusion
With Azure PowerShell, you can streamline tasks such as provisioning virtual machines, managing storage, and handling networking resources, all from a single command-line interface. Automating repetitive tasks through scripts allows you to reduce human error and enhance operational efficiency. Additionally, Windows Powershell Training integration with Azure Automation enables scheduled operations, freeing up time for more critical tasks. Leveraging Azure’s extensive support for PowerShell cmdlets gives you complete control over your environment, helping ensure your infrastructure is consistently up to date and compliant. By using Azure PowerShell in combination with best practices and security measures, you can maintain a highly resilient and scalable cloud infrastructure.